Showing posts with label Interior. Show all posts

Tuesday, June 23, 2015

Uplifting

Kyle told me to name this post 'Uplifting' - I apologize in advance for the bad pun.

So you may remember many moons ago when we installed the center structural beam for the ICF portion of the house Kyle very smartly had the foresight to add two metal straps for anchors for lifting. He figured that in the future we may have the need to haul some big pieces up to the second floor and this would provide a lifting point. Details of this install are here.

Well low and behold we just had our newly refinished salvaged claw foot tub and a storage armoire that we needed to get to the second floor. Take my word for it - picking up a large cast iron tub that has been newly enameled, read slippery, is not easy nor light and that dang armoire weighs a ton. So those straps to the rescue!!


So the straps are permanently attached around the main house beam and have anchors attached to them. We used an electric winch to attach to them and then Kyle rigged the tub to attach to the winch so it would safely haul the tub and armoire up and keep it balanced and even on the ride.


It worked perfectly, the tub went up in mere minutes and the armoire took a little fiddling with the rigging but then we got it over the railing and it is in place. It was so easy and saved years on our backs from having to carry them up the flight of stairs.

Next post will be all about the bathtub - bet you can't WAIT!

Wednesday, August 14, 2013

Hold on to your pants - we got us some plumbing

Really can't gush on this post, can't go on and on about the joys of plumbing and indoor running water and flushing toilets. It really is NOT glamorous, exciting, adrenaline rushing or remotely interesting at all.

But nevertheless in the name of full disclosure and just because I went to the trouble of taking the pictures I will share this momentous milestone with all of you.

The plumbing has proved to be a challenge as all the 'water' appliances are in the container side of the house and having sandwiched two containers together we don't have the luxury of an interior wall to chase plumbing pipes through. Hence there were a few renditions of the plan but Kyle finally came up with a layout that fit the house, that we could work with, with the finished look of the house and most importantly a plan that the County Inspector signed off on.

We needed to get all the plumbing pieces installed before we could have the spray foam insulation applied as it would be a huge ordeal to cut through it after the fact to run the plumbing through both in the walls of the exterior of the container and underneath the containers. Kyle also ran all the conduit for the electric underneath the containers so all we need to do is run wire to connect the dots.

The other thing we needed to do before we could even put most of the plumbing and electric in was to clean up the underneath of the containers. Sounds easy enough, it is cleaning........WRONG!
THIS WAS THE MOST DISGUSTING JOB AS OF YET ON THIS HOUSE BUILD. Did you hear me, DISGUSTING.

It involved laying on my back on one of those wheeled boards that car mechanics use with a metal grinding wheel in hand, eye glasses, gloves, a face mask, a face shield in 90+ degree weather and on the second go around, a doo rag as it took me days to get the rust pieces out of my hair. Grinding the rust off the underneath the containers was miserable. It went everywhere, in every crack, nook and cranny. I came out from that 2' crawl space each time covered head to foot in brown filth, I was filthier than any time from the horse days. So glad that, that job is behind me and done and the black widow spider was relocated (to the vacuum).

Anyway, onwards and upwards after buying about 200+ plumbing elbows, turns, angles, connectors, reducers and multiple other parts and pieces that seemed to have no name but all come in black ABS plastic.


It is tricky to plan the venting for every single toilet, sink, shower etc..and how they can all tie into one another so your roof doesn't look like swiss cheese. This one above is for the kitchen, overcoming the venting code to maneuver around the window directly above it. 


This is the downstairs bathroom for the sink, toilet and shower. We lucked out here because of the site built wall between the bathroom and laundry room directly behind it.


This is the master bathroom, difficult to overcome some challenges here as there is the structural red iron on the exterior of the house that we cannot drill through so took some ingenuity on Kyle's part. And again the window issue above the sink came into play. This design resulted in some unique design finishes that we came up with so stay tuned for that down the road.


This takes the downstairs bathroom vent up to the roof. This runs through the master closet and will get chased out.  


Drainage from the master bathroom shower (above) and toilet (below) that come down into the utility room and back hallway, respectively and the hallway will get chased out.


Our clean-out, the final chase design will provide a small broom closet here that will allow access to the clean-out.


So once all the plumbing and venting network is in place the openings to the fixtures get covered up and then the entire system gets filled with water to ensure that there are no leaks. Here is Kyle filling the whole system from the roof top. It was actually kind of fun and SUCCESS first time. Way to go baby, nice planning and install. Who needs a plumber and we have INDOOR plumbing. It was all worth it.


And a moment to appreciate the nice view a the end of it all. Phew.....now on to the next thing - insulation!


Thursday, August 8, 2013

Somewhere to hang the welcome mat

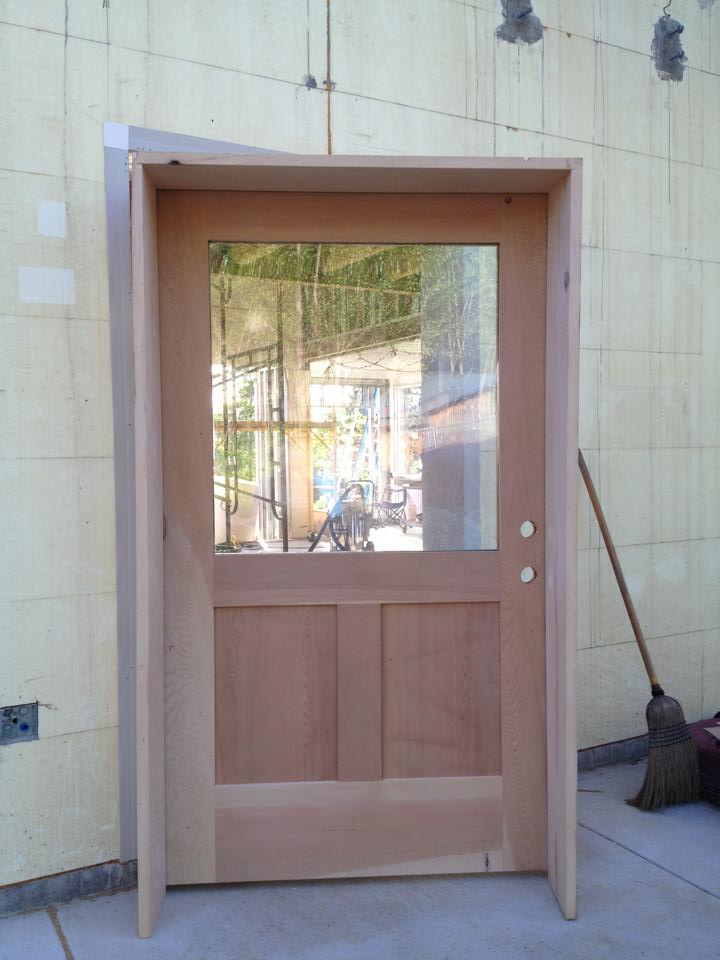
We found this incredible local guy - Jim Briggs of Jim's Custom Doors and Molding who does gorgeous doors and woodworking so we took over some of the huge wood panels that we salvaged out of the old mobile home to see if he would make a door or two for the house.

Of course Jim couldn't be nicer and it is very cool to see some of the projects he has going at his shop. We are pretty small potatoes compared but he still did an amazing job.

The wood panels are big 8' by 4' and 2" thick cedar panels that lined the living room and some bedrooms in the mobile home that was on the property. They were originally milled from trees on the property so it was important to integrate them into the new house in some way and what better way but the front and back doors.

The back door (technically side door that is on the north wall of the house) also needed some special installation in the form of a doggy door. But no ordinary doggy door. It needed to be tall enough for Denali to get in and close enough to the ground that Ziggy could jump through. We also worried about energy efficiency as some of the dog doors don't close very well after repeated use and we wanted something that would hold up to all four, yes four dogs now, using it multiple times a day.

After a lot of research we came across this door.


The Plexidor opens up sideways rather than one large mono-flap like most dog doors. This type of design holds up much better and is more energy efficient with a tighter closure than most doors. It is also safer via the locking mechanism and is NOT white which was very important.

So with the new doggy door in-hand, Jim got to work on the doors. And in no time we had a front and back door ready to go.


Front Door


Back Door with opening where the doggie door will fit in


We also had to source the hardware for the doors. The hardware we really wanted were handmade from Chili and about $700 per door. So we had to settle for something a little simpler and we went with simple black hinges, hey, you gotta make compromises here and there and pick your indulgences.


So now the doors await a good coating of tongue oil and then they can be installed. We aren't in a hurry to get them installed until all the big construction work is complete in the house for fear the glass gets broken or they get dinged up. So they are in safe storage in the house for now. 

Next up, that pesky plumbing and venting. And pesky is putting it nicely.


Wednesday, July 31, 2013

Post Blogging Hiatus

And we are back from our blogging hiatus. Sorry for the delay in updates but we had some things with the blog to work out and I thought it best to suspend blogging till those were resolved.

Now we are good to go and it is time to get caught up with your favorite soap opera home building project. When we last left you I was touting that spring has sprung. That lasted about 2 days and we hit full blown summer. It has been 90+ for about all of June and July but fortunately we have a pretty steady breeze which has made it tolerable for working and the house is really cool (temp wise) so it is nice to have inside jobs during the hottest part of the day.

So I won't update the whole progress in one post but drag it out in true blog-like fashion. But we will kick it off with the stairs. They were the next big install chronologically and what a step forward it was.

RTs Mobile Welding welded the stairs offsite and then delivered the treads and stringers for final install on site. We prepped for the stair install with two things.

One was installing the electric for stair lights, little LED lights that will sit recessed in the wall and light the stairs. It was a bit tricky getting the placement right that would match the angle of the stairs and be a even up the stairs. Because of the placement of the stairs that turned halfway up a few of the lights are set in the container wall studs and the others are set in the ICF wall. Phew, things are never easy.


So we rough set the stairs in place and held them up with stands and come-alongs to get a rough idea of where we wanted to place them.


Once the lights were placed we sheathed the container wall with plywood. The plywood at the bottom of that wall alongside the stairs will ultimately get corrugated tin so we didn't need to be too careful about making it perfect. Of course while we were at it we kept sheathing up that wall and once we passed the stair height, those plywood pieces would be the finished product so the pressure was on to make it look great. 


Once this part was done we needed to protect the ICF wall from the welding that was needed to install the stairs. Not good to have sparks like that hit ICF foam blocks. So we jumped in and started plastering that wall to get a feel of the plastering product - Gigacrete, and how easy it would be. Of course there was was  along learning curve in the mixing and application on the wall. Upshot is, it looks fantastic but we didn't get it thick enough. Easy enough to remedy with a second coat but good to know and we also know what doesn't work. 

So now with the electrical in and the walls protected it was time for the stairs. Drum Roll.........


The stairs are in and WHAT a difference. Just not having to jump up and down ladders all day long as we move through the house. It is a huge time saver and exciting to see stairs, actual stairs.


And looked who has already tested these babies out ............


The single stringer is such a clean look it has made us rethink the railing approach. If I had my way there would be no railing, the European style but since the California Building Code (and most other states) think that babies will come to our house and hurl themselves off the stairs we have to have a railing that won't allow a 4" ball to fall. So there goes our nice clean, minimalist look.


The stairs will be painted black and then white oak treads will go on top of each metal tread with a little surprise so stay tuned for more on those treads!!!

Next post - new doors are here and plumbing and venting. So exciting.


Thursday, August 30, 2012

Finishing the ICF walls - Gigacrete

Now that the ICF walls are complete we are starting to turn our attention to how we are going to finish them both inside and outside and when.

We are using two products by a company called Gigarete for our finished interior and exterior surface. As we are not fans of drywall we jumped through hoops to avoid it but as with many alternative building materials we found that most options were not available in the U.S. and shipping from Europe (where most alternatives were manufactured) was ridiculously costly and defeated the mission of our "green" house. We also needed both coverings to meet the CA Building Code fire standard, again not easy to find.

Monday, August 20, 2012

The Calm AFTER the Storm

After the walls were poured we gave them a day to settle and cure and then the Evans crew came back and with Kyle they pulled down all the supports, removed all the sandbags and plastic and returned our house back to something that resembled a spacious home.


Wow, what a difference it has made getting all those supports, the space feels lovely now. 


Kyle even set up our chairs and little spool tables and we brought in the grill and had our first dinner IN our house. 


And there is my over-worked, underpaid love of my life. Yeh, I married that face.


It feels so cool to walk around the house now as it feels not only like a house but OUR house. I love it.


We get to see where the sun hits through the windows now and how things will fit into the space.


You can see all the bolts in place in the wall, just awaiting the roof.


We cleaned up all the leftover ICF pieces by cutting out the center plastic pieces and recycling the foam and the plastic centers. We were also able to empty all the sandbags and sent them home with Mike along with all those screws that went in to the shoring so he can re-use them on the next job.

So this week is getting the piping buried in the back and getting all the supplies for Justin to start on the roof.
We are also already started on another project which includes the southwest wall you see in the above picture and involves tearing all the ICF off the wall. Hehehe, yeh, you think we are crazy, we just put it up. Just wait and see!!!


Friday, September 16, 2011

After it went Wrong

Things go wrong - all the time but I figure as things go awry while I am working on the workshop or the trailer or our cabin in Twain Harte, I am learning (what NOT to do, not necessarily what TO DO) and hopefully things will go better on the house.

So to improve the trailer prior to move-in I wanted to paint the bathroom. I had to have one room in that thing that didn't scream early 90's bad trailer design with hospital walls. I wanted to paint the bathroom a bright, clean white. Into the fray with nasty, old paint (that I thought would work as a good primer coat) in 90+ temps in the trailer (no hook-ups for the A/C yet) I went to work taping off the edges and painting away.

After a complete coat I resigned that this paint had had better days better decades so I broke down and got a new gallon of bright white, semi-gloss LOW VOC (of course). 3 more coats (who knew hospital walls were such a baneful adversary) I stood back and smiled at the nice fresh feel it gave when you walked into the tiny room. Now wait for it - I went to pull off the tape before the last coat dried but didn't score the edges - BIG MISTAKE. I have read every blog on painting, every DIY Network, every This Old House episode, everything on how to paint and pull the tape off, you always cut the edges to get that clean look (you also don't use decades old paint left over from previous home owners as your base layer).

Needless to say huge swaths of painted surface came off along with my favorite Frog Tape. FAIL!

So with a visit from Jessica Ely, a little brainstorming and a quick trip to THE DEPOT. We amended the situation with this.


I was so upset with the painting situation I forgot to get a shot of the great peel. I gotta get better at taking shots of the bad stuff. But the remedy consisted of 5 sheets of this cool glass tile that was ridiculously easy to install - I mean a 3-toed sloth could of done it. There are a few tiles that look wonky and that is because the trailer back wall bows out, thus distorting the lines. Sometimes you just have to work with what you got.


The great part is that Jess and I bought 6 sheets of the tile, which was on clearance ($4 per sheet) and when I didn't need the last sheet THE DEPOT refunded it, they are truly awesome with their return policies.

I need to finish up the caulking in the whole bathroom, some touch-ups and then a big clean but it looks pretty good in there. I also have a new shower curtain and rail to go in there as I ripped out the old DOOR, who puts a DOOR on a shower in a trailer! I also want to add some shelving above the toilet too so stay tuned for that.

So the take-away (I hate MBA buzz words) is don't use decades old paint -DUH! Don't paint when its over 90 degrees (just like it says on the paint can) and score your tape before ripping it off......as I said, a 3-toed sloth would have more success in DIYing the trailer.

Note - yes, I would love to rip out and destroy that countertop but that's not going to be realistic at this point. Gotta put the limit on the trailer reno and because trailers are always irregular sizes and funky angles and nooks and crannies its a nightmare to retrofit so faux marbelized, plastic counters it is.

Wednesday, September 14, 2011

Learning plank

So we are moving forward with the house building. The county are making us demo our current house before we start on the new house. We are making slow headway with installing the new water and power lines, more on that in a later post.

With our current house getting ready for demo we will be moving into a 32ft trailer. Its actually really nice for a trailer with a separate bathroom, big bedroom, two La-Z-Boy recliners in the pop-out (that is RV talk for little bump out) and HEAT!! Which I am really excited about, it will be much warmer than our current house this winter.

I decided to do a few upgrades to the trailer, one of which was install new flooring to replace the carpet. Nothing worse than someone else's carpeting. So I looked for the cheapest laminated hardwood stuff out there as a) its a trailer and b) this was my first foray into laying hardwood floor so I knew there would be a learning curve, or plank.


We found this stuff at Costco and at $1.56/sqft it was financially ridiculously doable and destroy-able should the effort go array. We chose Golden Aspen color as it was light and you wouldn't want anything too dark and heavy in a little space like a trailer.

This stuff is a floating floor and it clicks into place on both the long and short sides. Sounds easy enough. Of course fitting this into a trailer meant that after all said and done, there were only 2 boards that didn't require ANY cuts of any kind. Phew, a lot of cuts, angles, re-cuts, re-measuring, cursing, cutting the wrong side, more cursing, re-measuring, re-cutting and running to Costco to buy another box.


I will say I tried hard to utilize my skills of efficient resource usage to minimize how much I would need and use. Which was going well until I realized these guys have you over a barrel.


You can see here how they click in place so there are overlap edges and underlap edges. So as you move and cut this design forces you to use a new board for EVERY cut. So if you have a board that you cut in half to fit into a spot, you cannot use the rest of that board because it now doesn't have the correct form on the top. So they trap you into buying A LOT more boards than you would need and leaving you with an immense amount of waste. NEVER again. A complete waste and very disappointing. The only redeeming quality is its CARB compliant and made of 74% pre-consumer recycled material. Look at all this waste, whole box!


The other issue is that it ruined 2 saw blades making the cuts, should have used the tile cutter after scoring. Needless to say Kyle wasn't happy when he went to cut a thick piece of wood for his project and the blade started smoking....Ooops.


The floor does look good. I added quarter round on the edges which finishes it well. I spray painted the registers using Oiled Rubbed Bronze Spray Paint by Krylon. It will be much easier to keep clean. I started in the bedroom and you can see some of my mistakes but I learned a lot in the process and by the end really go the hang of it and was utilizing some other tools to perfect my cuts, angles, edges and seams.


Thursday, August 18, 2011

Slidin' Doors

One thing we are keen to incorporate into the house are sliding doors. Wherever it makes sense to put them and they will fit we want the door to slide and not swing. Some might be pocket doors and others might be just fixed to the wall.


You lose a little wall space but you gain a lot of space inside the room and hallway by eliminating the swing.


You can also use all kinds of reclaimed items to make the doors out of as they don't have to be perfectly square and plum.


Its also cool to see all the different kinds of hardware you can use and displaying that is part of the charm.


It can get pretty  rustic and the handles can be made out of anything as they are just pulls and not the click into place knobs.


One issue is that they aren't always secured shut and with one puppy that is quite adept at opening and closing doors there may be rooms we want to ensure he can't get into so you can get creative with locks and bolts.


I love the double doors, makes such an impact when you open both to reveal the next room.
Ohhh the drama!


This one below is my favorite, I love the window panes, very British but you have to have a set up like below or else it will look odd when its open against a wall. Maybe as a pocket door for a bathroom and you could frost the windows to let light in.


These are such great, cool, eclectic options for the house, each door can be different and unique and we can do them ourselves as there is a lot of room for error. You can take a regular door and rework it so it rolls instead of spins. The one thing is you would want to watch the weight of the door, nothing to heavy for the weight on the hardware at the top as well as the weight to push it closed could get to be a headache.