Thursday, March 24, 2016

Stairway to Joy

It is a stairway to joy because both these second floors pre-stairs were miserable to get to. The first second story area in the Workshop was for my office. It already existed when we bought the property on the west side of the shop but was open and just covered the top of the bathroom below.

We enclosed the second story, insulating it in order for it to be efficiently heated and cooled to use it as my office. After that we built the rest of the second floor on that side of the Workshop. The stairs to get to upstairs were already built and were AWFUL. Every step was a different height, VERY narrow and very steep. It was crazy and if I had a nickel for every time I cracked my shins on one of those steps blah, blah, you know the rest.

Ziggy was the only pup to venture up the stairs, even then it was a tad hairy for him, he didn't really like it. I carried Chinny up to hang out while I worked but I never let her walk down them and it made me nervous that one day she would try to get down herself and get hurt (yes, ridiculously hovering fur momma).

A little while ago we built the second story on the other side of the Workshop, the east side, for additional storage to free up more floor space on the main level. Since finishing that side we were using a ladder to get up and down which in itself is not convenient but also was tricky when carrying things up and down.

So we devised a plan to build two sets of stairs that were longer and with even risers but to do this the stairs would fall further into the open space of the main level. So we planned to cut the stairs and hinge them so we could flip them up when not in use and then flip them down to get up and down them.


It is definitely tricky building stairs and calculating everything you need to account for including the landings, length of the run and rise, number of runs and rises, total length of stringer yada, yada, yada. Fortunately there are many online tools to help with the calculations but sometimes you have tweak little things here and there and it is always hard to account for how little changes will effect the overall dimensions and layout. Sighhhhhh.


Well the great news is it all worked out in the end. We got both staircases built and hinged and they are AWESOME - cue angels singing in heaven. It is so cool that they are hinged and that works out so well. They are great to walk up and down and one more big project done!!


The other great thing about the stairs being done is now we have bonus storage underneath. The West stairs will be home to a new paint/caulk cabinet and the East stairs will house the new GIANT compressor and the dust collector. It is great to get more and more stuff off the main floor. Phew, glad this one is over.


We have also been insulating the shop, building new exterior doors, re-framing the north and south wall with new windows and the doors. Will post that progress next.


Wednesday, August 5, 2015

1,250,334 lb door

It turned out amazing but phew does it weigh a ton.

Apparently we aren't shy around here and doors for privacy are optional. We did get a door on the guest bathroom though prior to its installation it didn't seem to deter visitors (shows what kind of company we keep).

Anyhooo, after a few guests and a few issues we decided it was time to get a door on the spare bedroom. We are talking some petty crime of dog treat stealing, some early morning wake up calls up close and personal and secret bed sleepers that would sneak in there and help themselves to any and all spare pillow real estate. This is not the place to name names but in the spirit of Cottonwood Meadow MOST WANTED we are looking at you Wolf (rest in peace beautiful boy) and Ziggy!

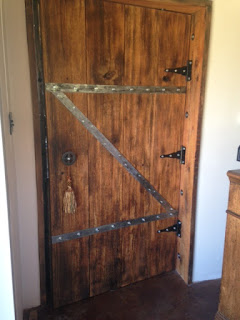
So back to the door. Kyle has been dying to build a door out of the wood we salvaged out of the old hay barn. Great idea, with big metal hardware it will really be an amazing creation. 

And it is, but it weighs 1,250,334 lbs....it really does. Good thing our walls are a foot thick with 6 inches of that is all concrete baby. Anything less and I am not sure it would hang. Heck I am not sure how we picked it up and got it hung.


This thing is a beast. Made from four planks from the old hay barn floor and is an inch and a half thick. It really is a thing of beauty and most importantly serves as a stunning entrance to our visitors oasis.


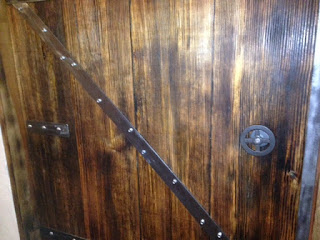
We planed the boards, cleaned up the edges and then burnt them Shou-sugi-ban style and then waxed the door. The metal straps and hinge supports were made by Kyle from recycled metal.


The best part is the door handle that Kyle made - this was made from a salvaged valve he found. The door threshold on the side is made from angle iron and keeps the door from swinging back and forth.


All the door needs now is a door lock which is in the works and will be AWESOME! Stay tuned.


Tuesday, June 23, 2015

Uplifting

Kyle told me to name this post 'Uplifting' - I apologize in advance for the bad pun.

So you may remember many moons ago when we installed the center structural beam for the ICF portion of the house Kyle very smartly had the foresight to add two metal straps for anchors for lifting. He figured that in the future we may have the need to haul some big pieces up to the second floor and this would provide a lifting point. Details of this install are here.

Well low and behold we just had our newly refinished salvaged claw foot tub and a storage armoire that we needed to get to the second floor. Take my word for it - picking up a large cast iron tub that has been newly enameled, read slippery, is not easy nor light and that dang armoire weighs a ton. So those straps to the rescue!!


So the straps are permanently attached around the main house beam and have anchors attached to them. We used an electric winch to attach to them and then Kyle rigged the tub to attach to the winch so it would safely haul the tub and armoire up and keep it balanced and even on the ride.


It worked perfectly, the tub went up in mere minutes and the armoire took a little fiddling with the rigging but then we got it over the railing and it is in place. It was so easy and saved years on our backs from having to carry them up the flight of stairs.

Next post will be all about the bathtub - bet you can't WAIT!

Wednesday, June 25, 2014

Put a Hat on it

We all know how key hats are to keep warm in winter or keep the sun off us in the summer. Or if you are lady on Derby Day you KNOW how key a fabulous hat is.

Well it is the same with our house, the hat is key to both look and performance. We knew pretty early on in the planning process that we wanted to go with a standing metal seam roof. This was for a few reasons, the first and most important was solar reflective index (SRI) which is a measure of a surface’s ability to reflect solar heat. I wrote more about this here.

Not having air conditioning in the house, we needed to jump through hoops to make sure we minimized as much heat entering the house as possible. A lighter colored roof was key to reflect as much sun in the summer as possible and this could be best accomplished with a standing metal seam roof.


They also have great longevity, it should last over 30 years, it has a minimum of 25% recycled metal content and is 100% recyclable at the end of its life, has little to no maintenance and looks great. We went with a galvanized metal roof that has a light silver look and high SRI. White would only have been better.


We are really happy so far with the roof, a few angles made installation tricky on the spare bedroom roofline but we worked with a local roofing contractor and got 'er done.

Roofs are one of those house parts that  you don't want to think about much after installation but investing in a good roof is key to that being possible. As with many of the other parts of the house we chose to invest the bulk of our money in pieces that won't be replaced in our lifetime. We will remodel kitchens and bathrooms and redecorate but getting great windows, roof, insulation was vital and hence took the majority of our budget.


One of the important pieces to a good roof is sealing all the protrusions through the roof like vents and the chimney. Though the chimney rises on the outside of the house we still worked hard to seal the area where it penetrated the roof as the roof structure is wood and we didn't want water seeping and compromising the framework.

And so far this spring/summer we have had some quite warm days and that house is cool as a cucumber!!

Monday, May 5, 2014

Latest and Greatest

Even though I have a few more posts to get you to where we are now there are many, many requests to see pics of what the house looks like now, so here are a few latest and greatest shots.


Master Bath Shower and vanity- still awaiting a soaking tub but it is pretty nice with a great view.


Master bedroom - yeh, we need a bed and the temporary railing will go out to the deck eventually.


Loft area overlooking the living room


Kitchen where you can see the container walls


Rear view of the house and back patio. The metal posts are going to hold the deck off the master bedroom.


Side back view of the house with the second bedroom off to the right
 

Look through the front door across the entryway and living room out the back french doors.


Front view of the house